
This guide covers the essentials for managing your presence on Crafted Canadian, from syncing your Stripe account for payouts to optimizing your product listings and shipping zones.
Welcome to The Crafted Canadian Dashboard. As a vendor, this is your central hub for managing your digital storefront, tracking sales, and ensuring your customers have a seamless experience.
Table of Contents
Setting Up Your Shop Profile
Your shop profile is your “brand face.” Consistency here builds trust with Canadian makers and shoppers.
- Banner & Photo: Go to Settings > Store. Upload a banner (1600x400px recommended) and a profile picture (your logo).
- Storefront Details: Ensure your store name, category, address, and phone number are accurate. You have the option to display on your storefront or not.
- Storefront Details: Check box to show terms and conditions on the store page / On vacation to temporarily publicly close your store.
- Terms and Conditions – Check box to show your store’s terms and conditions on the store page
- Go on Vacation – Check this box to enable Vacation Mode and enter the dates your store will be closed. During this period, you can choose to continue accepting orders and inform customers of any modified shipping or delivery timelines.
- Privacy Settings: Check box if you wish to have your store address displayed on your vendor page and the vendor directory or not.
- Set Cart Amount: You can set the minimum and maximum order amounts allowed in your store.
Addons (Storewide)
The Storewide Add-ons feature allows a vendor to create a set of optional extras once and automatically apply them to multiple or all products in their store, rather than creating the same options repeatedly for each product. These can include engraving, gift wrapping etc
Stripe Payment Setup
To receive payouts automatically, you must link your shop to Stripe. This ensures that when a customer pays, your earnings are calculated and transferred securely to your stripe connected account.
- Step 1: Log in to The Crafted Canadian Dashboard.
- Step 2: Navigate to Settings > Payment.
- Step 3: You will see Add Payment Method as a payout option. Click the “Direct to Stripe” button.
- Step 4: You will be redirected to Stripe. Follow the prompts to either log in to an existing account or create a new one.
- Step 5: Once authorized, you’ll be sent back to your dashboard. Your status should now show as Connected.
Configuring Shipping
Shipping is one of the most important aspects of your digital storefront. The Crafted Canadian provides options to calculate shipping costs so you are never left out of pocket.
- To get started, navigate to Settings > Shipping in your dashboard, click to add Shipping Policies, where you can clearly define your processing times and refund rules for customers.
- Choose one of the following shipping methods that best fits your business model
Method 1: Shipping by Zone (Recommended for Regional Sellers)
Use this guide to set up shipping rates for your store based on customer delivery zones, where they are located. For example, Ontario, BC, NB, Yukon etc where a different shipping rate may apply to each zone.
Select Province/Territory setting, you only need to include the provinces or territories where you intend to offer shipping.
If there are locations where shipping is not available, those can simply be excluded from the shipping zone or configured under separate shipping zones based on your requirements.
Example
To select Zone(s), click on the empty box next to Select Province Territory and all will be dispalyed
If British Columbia and Ontario are added in the Select Province Territory box, this means that the shipping method will only be available for customers whose shipping address is within these two provinces.
Vendor Setup: Configure Shipping Rates
- Log in to your Vendor Dashboard.
- Go to Settings > Shipping.
- Select the shipping zone you want to configure.
- Add or edit the available shipping method for that zone.
- Select one of the options – Flat Rate / Local Pickup / Free Shipping etc
- Select Edit and Enter the shipping cost, conditions, or minimum order amount if required.
- Save your changes.
- Repeat the process for each shipping zone where you want to offer delivery.
Product Quantity Formula (Optional):
If you want shipping charges to increase based on the number of items in an order, use the following formula:
5 + (([qty] - 1) * 2)How it works:
- The first item costs $5 to ship.
- Each additional item adds $2 to the shipping cost.
Examples:
- 1 item = $5
- 2 items = $7
- 3 items = $9
- 4 items = $11
Common Shipping Options
- Flat Rate: Charge a fixed shipping fee for customers in the zone.
- Free Shipping: Offer shipping at no cost, often based on a minimum order amount.
- Local Pickup: Allow customers to collect orders from a specified location.
- Shipping Classes: Apply different rates for different product types, such as heavy, fragile, or oversized items.
Example Setup
| Shipping Zone | Vendor Shipping Rule | Customer Result |
| Ontario | Flat rate of $10 | Ontario customers see a $10 shipping option at checkout. |
| Rest of Canada | Flat rate of $18 | Canadian customers outside Ontario see an $18 shipping option. |
| Local Pickup Area | Local pickup enabled | Nearby customers can choose pickup instead of delivery. |
| Free Shipping | Minimum Order $75 | Free shipping will be applied when minimum order value is $75.00 |
Testing the Setup
- Add a vendor product to the cart.
- Go to checkout.
- Enter a customer shipping address that matches one of the configured zones.
- Confirm that the correct shipping method and rate appear.
- Test another address in a different zone to confirm the rate changes correctly.
When Shipping by Zone and selecting the bottom option – All of Canada (if not shipping by province)
A shipping zone is a specific geographic area (like Ontario or British Columbia, Canada, USA, The Rest of the World) where a different set of shipping rules applies
- On the main Shipping screen, you will see a list of predefined zones (e.g., Canadian provinces and territories).
- Find the zone you want to configure and click the three vertical dots (
⋮) on the far right under “Actions”, then select Edit. Click Add Shipping Method. You can choose from options like:
- Flat Rate: A standard fixed cost for anyone in that province.
- Local Pickup: Allow customers in your area to bypass shipping fees entirely.
- Free Shipping: Can be triggered automatically if a customer spends over a certain amount.
- Table Rate: provides various conditions:
- none – Always applies – (Flat $15 shipping for every order)
- by price – Based on cart subtotal – ($0–$99 = $12 / $100+ = Free)
- by weight – Based on total order weight (0–2 kg = $10)
- item count – by total number of items in the cart – (1–5 items = $12)
- item – per quantity of products in cart – (charge $2 per item)
- Distance Rate
The Distance Shipping module in Dokan Pro is designed primarily for local delivery businesses, florists, bakeries etc
To select a shipping method, hover over it and click Edit to define the exact cost and tax settings.These options are managed by zone rather as well as globally, which gives you the flexibility to offer different shipping rules for different regions.
When Shipping by Zone however wish to apply same rate to all zones in Canada
- Go to the bottom option – All of Canada (if not shipping by province)
- Select Province/Territory – From the dropdown menu select and add All the provinces/territories to ship to.
- Save Changes
Following options available
- Flat Rate: A standard fixed cost for anyone in that province.
- Local Pickup: Allow customers in your area to bypass shipping fees entirely.
- Free Shipping: Can be triggered automatically if a customer spends over a certain amount.
- Table Rate: provides various conditions:
Save and Publish the Product
Troubleshooting
- If no shipping method appears at checkout, confirm that the customer address matches a shipping zone.
- If free shipping does not apply, review the minimum order amount or conditions set by the vendor.
- Configure Weight Calculation
Rates – This is where you define your table rates which are applied to an order.Set: Calculation Type -> Select: Per Order
This tells the system to calculate shipping using the total weight of the customer’s order instead of each individual item - Create Weight-Based Shipping Rates
– Select option and Click Add Shipping Rate ( a new row will be created for each row)
– Create one row for each weight range, table rates example below.For each row
1. Under Condition -> Select Weight
2. Complete – Minimum & Maximum Weight
Note the next starting weight must be an increment of the previous weight to avoid incorrect calculations
3. Shipping Cost – enter in Row Cost
Click “Add Shipping Rate” and repeat until all weight ranges have been added
Click Save Changes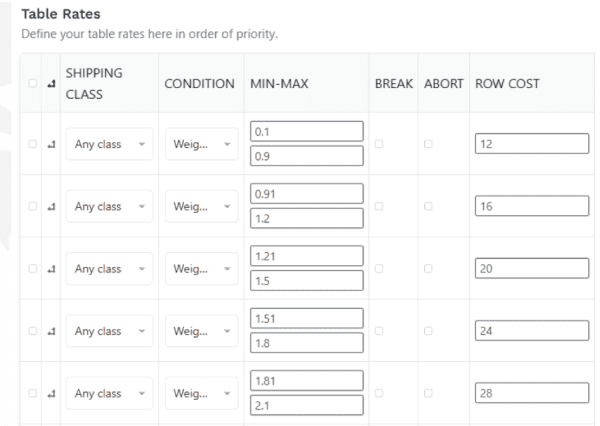

Repeat until all weight ranges have been added
Click Save Changes
Repeat same steps for Every Province/Territory (applicable zones) since the costs will vary
Save -> Click Save Changes
Testing Your Shipping
After saving your rates:
• Add products with different weights to your cart.
• Enter a shipping address in each province.
• Verify that the correct shipping charge is displayed at checkout.
• Test multiple quantities to ensure the total order weight is calculated correctly.
Helpful Tips
• Always enter the correct product weight before publishing a product.
• Use Order calculation so shipping is based on the combined weight of the cart.
• Keep your weight ranges continuous (for example, 0–1 kg, 1.01–5 kg, 5.01–10 kg) to avoid gaps.
• Review your shipping rates periodically to reflect carrier price changes.
• Test your shipping settings after making any changes.
Method 2: Ship by Country / Flat Rate (Recommended for Simple Rules)
If you prefer to set a base rate for all of Canada and only charge extra for remote areas or international orders, this is the easiest method.
- From the main Shipping screen, click the text link near the top that says “To Ship by Country/Flat Rate Click Here”.
Global Settings: Check “Enable Shipping”. Here you will define your baseline rules:
- Default Shipping Price: The standard cost to ship an order.
- Per Product / Per Qty Additional Price: Add a small extra fee if a customer buys multiple items in one order (e.g., $2.00 per extra item).
- Processing Time & Policies: Inform buyers how long it takes you to pack the order (e.g., 1-3 business days) and paste your return rules.
Location Overrides: Scroll down to the location blocks. This is where you override your default price.
- Click Add Location to add a new country or region.
- Example: You can set the Ship to “Canada”, and then define specific costs for “Yukon Territory” ($20), “British Columbia” ($15), and set “Everywhere Else” ($12).
- You can add entirely different countries, like the United Kingdom or Austria, and assign them a flat international rate.
Managing Your Products
- Whether you are launching a new handmade item or updating existing stock, the Products tab is where you’ll spend most of your time.
- When you click on Products, you will see a list of all your items. This screen gives you a quick snapshot of your inventory:
- Stock: Quickly see if an item is “In stock,” “Out of stock,” or view the exact quantity remaining.
- Status: See if a product is currently live (Published) or hidden (Draft).
- Earning: See exactly how much you earn from a sale of that item after marketplace commissions.
- Actions: Click the three vertical dots (
⋮) on the far right of any product to edit, delete, or view it. - To create a new item, click the maroon + Add new product button in the top right corner.
The Product Setup Screen
- When adding a new product or editing an existing one, you will use the detailed product screen. Here is a breakdown of every section to help you list your items perfectly:
Basic Details & Images
- Title: The name of your product exactly as customers will see it.
- Product Type: Leave this as Simple for a standard product. (If you sell variations, like different sizes or colors, you would change this to Variable). Check “Downloadable“ or “Virtual” only if you are selling digital files or services that don’t require shipping.
- Price ($) & Discounted Price ($): Set your regular price. If you want to run a sale, enter a lower price in the Discount field.
- Images (Right Side): Click the large box with the image icon to upload your Main Image. Use the smaller box below it with the
+Sign to add extra photos to your Product Gallery.
Adding Tiered Pricing Rules
Use Tiered Pricing to offer customers lower prices when they purchase larger quantities of the same product. This helps encourage larger orders.
- From your Vendor Dashboard, go to Products.
- Click Edit on the product you wish to update (or create a new product).
- Scroll to the Tiered Pricing Rules
- Click Add Rule
Inventory Management
- Enter the following for each tier:
- Minimum Quantity
- Price per Item
- Repeat the process for each additional quantity break.
- Click Save Product or Update to apply the changes.
Example
Quantity Price
1-4 $20.00
5-9 $18.00
10+ $15.00
- Click the Inventory header to expand it.
- SKU: (Stock Keeping Unit) This is optional. It’s your own personal code to keep track of items.
- Stock Status: Manually set it to “In Stock” or “Out of Stock.”
- Enable product stock management: Check this box to have the system automatically count down your inventory. Once checked, a new box will appear for you to enter the exact Stock Quantity you have on hand.
- Add-ons: If you offer personalizations (like custom engraving), you can add custom text fields or checkboxes for the buyer to fill out before adding to the cart.
Shipping and Tax
- Click the Shipping and Tax header to expand it.
- This product requires shipping: Ensure this box is checked if you are mailing a physical item.
- Weight & Dimensions: Enter the weight (in kg) and the Length, Width, and Height (in cm). This is crucial if you are using calculated shipping rates based on box size.
- Tax Status & Class: Choose whether this item is taxable based on your business registration status.
Linked Products: How to Add Upsell Products
Use these steps to add upsell more of your store products. Whether a different product or a premium alternative or complementary products will appear while customers are viewing a product page in your store.
Note – add between 2 and 5 items.- Scroll down and open the Linked Products section.
- Locate the Upsells field and click inside.
- Begin typing the name of the product you would like to recommend/add
- Select the product from the search results
- Repeat this process to add additional upsell products if desired.
- Save or update the product.
- Check the live product page to make sure the selected upsell products appear.
How to Add Upsell Products
Information entry same as above – The cross-sell products are usually related or complementary products to go with the selected product.
The Cross-Sell products are displayed on the Shopping Cart page, after a customer has added a product to their cart.
Set up Variable Product
- Title: The name of your product exactly as customers will see it.
- Product Type: If you sell variations, like different sizes or colors, you would use this option.
- Price ($) & Discounted Price ($): Set your regular price. If you want to run a sale, enter a lower price in the Discount field.
- Images (Right Side): Click the large box with the image icon to upload your Main Image. Use the smaller box below it with the
+Sign to add extra photos to your Product Gallery. - Attribute and Variation: You have to scroll down to where to manage attributes and variations for this variable product.
- Choose an existing attribute, such as Size or Color, or “Add Attribute” for a custom attribute. I will use “color” in this example.
- Name: Enter Attribute Name – Colour, Material, Finish, Size etc
- Values: Add attribute values separated by vertical bars (button above the Enter Key on keyboard) – for example: Small | Medium | Large | X-Large
- Enable the 2 options Visible on product page and Used for variations.
- More Attributes: can add more than one attribute, for example colour
- Enable the 2 options Visible on product page and Used for variations.
- Click Save Attribute.
Configure Each Variation
Adding Discount Options
Open each variation and complete the required fields. At a minimum, add a regular price to each variation, as variations without prices will not appear on the storefront.
- Variation image: add an image if the option has a unique appearance.
- SKU: enter a unique SKU if you track inventory by variation.
- Regular price and sale price: add pricing, sale price is optional.
- Stock status: choose in stock, out of stock, or manage stock.
- Weight and dimensions: only add if shipping depends on product size or weight.
- Description: add a short note if the variation needs extra explanation.
- Optional – Wholesale for this product variation
Trouble Shooting Tips
- If variations do not appear, check that the attribute is enabled for variations.
- If the product shows as unavailable, make sure every variation has a price and is marked in stock.
- If the wrong image appears, assign images directly inside each variation.
- Check Enable Bulk Discount to activate quantity-based discounts.
- Enter the Minimum Quantity a customer must purchase to qualify for the discount.
- Enter the Discount % to apply when the minimum quantity is met.
Example: If you set the Minimum Quantity to 20 and the Discount to 30%, customers who purchase 20 or more units will automatically receive a 30% discount.
Other Options
- Here, you can change the Product status to “Draft” to hide it while you work on it. You can also add a Purchase Note—a special message that is automatically sent to the customer after they buy this specific item.
Save and Publish the Product
- Click Save Product or Save Draft after completing the variation setup.
- Preview the product page and test the dropdown options.
- Confirm that each variation shows the correct price, image, and stock status.
- Submit the product for admin review when ready
Recommended Test Before Going Live with Product
- Add an existing Free Shipping product to your cart and confirm shipping remains $0.
- Add a newly created product to your cart and confirm the shipping charge is applied correctly.
- Test a cart containing both product types to ensure shipping is calculated as expected.